Ch008 - Understanding our Game Structure
Understanding our Game Structure

If you have been following the chapters in the first half of this book we have been building up our game from scratch bit by bit. Otherwise you may have been adapting the Grid Game Template and are reading this chapter to find out more about the structure of our game. You may have been doing a bit of both. This chapter covers more detail on how our game fits together. In the following chapters there tutorials for how to add different elements to our game. Here we will try to bring together the two approaches so that you can continue by dipping into the rest of the book in what ever order you want to.
How the code of the two approaches is similar and different
If you have been working your way through the chapters then the you’ll understand the code of the last chapter Adding Hazards which is here https://jamm-labs.github.io/ggcp/add-hazards-chapter/game.js
Alternatively if you are adapting the Grid Game Template - then the code or that is here - https://jamm-labs.github.io/ggcp/grid-game-template/game.js
Just about all the code that we have created “From Scratch” by following the chapters in the first half of this book is in the “Grid Game” Template code but there are some sections of code in the Grid Game that aren’t in our From Scratch code. So let’s have a look a some of the similarities and differences.
How the code is similar
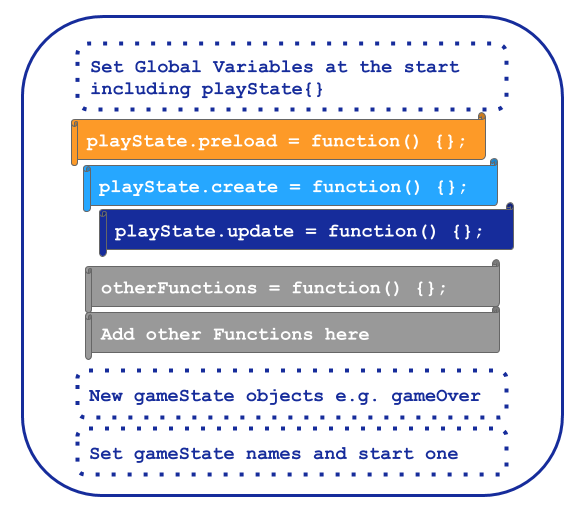
The code that we have created From Scratch has the following structure more or less.
global variables
create playState object
-->playState.preload function
-->playState.create function
-->playState.update function
-->takeCoin function
-->hitHazard function
-->restart function
create game states
start main game state
Understanding what happens in each section of this code structure will really help us when we start to copy and paste new sections of code from to make it easier to visualise, this structure be mapped out as a diagram below.
If you compare the code from the Grid Game there are some extra elements that you might want to know more about.
Adding Sounds
There are sounds which happen when you touch a coin or a hazard in the Grid Game code which we don’t have in our from From Scratch code.The process of adding in sounds is explained in Adding your own Sound Effect. This example is for a jump sound rather than touching a hazard or coin, but the process is the same.
Adding Levels
One of the big differences in the Grid Game code is that we have three different levels. Comparing the code this is first clear when we see the variable currentLevel in the Global Variables section at the start of our code.
var currentLevel =1;
Later in the code there are some key sections which create our three distinct levels. First of all we have the grid design sections where you can change the location of the platforms, coins and hazards. For example here are the first few lines of the design for level 1.
  // Design the level. x = platform, o = coin, h = hazard.
  var level1 = [
      "                 ",
      "                 ",
      "    o            ",
      "                 ",
      "  xxxxx          ",
In technical terms this level one variable now has a data structure of an array. We don’t need to know much about arrays at this level but it is worth remembering that they are useful for doing things efficiently in combination with loop code structures. In fact that is what needs to happen next in our code.
Next step is to send the level data to a loop to turn all of our x’s, o’s, and h’s into platforms, coins and hazards on the screen. We have a separate function which does this work called. Here are the first few lines of this function, for the full version you can look at the code of the Grid Game.
function loadLevel (level) {
    for (var i = 0; i < level.length; i = i + 1) {
        for (var j = 0; j < level[i].length; j = j + 1) {
            if (level[i][j] === "x") {
                // Create a wall and add it to the 'platform' group
Are you still paying attention? Good, because the next part is important! :)
To decide what level gets loaded there is a conditional if statement that checks what the currentLevel variable is and then sends the right level data to the loadLevel function.
  if (!currentLevel || currentLevel === 1) {
    loadLevel(level1);
    // add extra code for just level one here

  } else if (currentLevel === 2) {
    loadLevel(level2);
    // add extra code for just level two after here

  } else if (currentLevel === 3) {
    loadLevel(level3);
    // add extra code for just level three after here
  }
So why is this so important? This is the section of your project that you will add new code into if you want to add new things to just one level of your game. Yes it’s that important that it’s right there in the code comments. There is more information on how to do this works in Adding More Levels.
Navigating Levels
As there are several levels, there is also a way to navigate between levels. While both sections have a similar hitHazard function which restarts the play state, there is a bigger difference in the code that checks if there are any coins left.
  if (coins.total === 0) {
    nextLevel();
  }
This check now calls a new function called nextLevel which gets called. This function increases the level number by one and then restarts the game
var nextLevel = function () {
    currentLevel = currentLevel + 1;
    game.state.start("play", true, false, currentLevel);
};
There are some more parameters in the line which restarts the play state. It’s the last one, currentLevel, that is important here, as we are passing the new level value along as the play state starts. This means that level 2 will be loaded up.
And that’s not all. We need to make a similar change to our restart function too.
var restart = function () {
  currentLevel = 1;
  game.state.start("play", true, false, currentLevel);
};
In this example the currentLevel value gets set back to one so you have to start from the beginning again if you hit a hazard. Harsh!
Getting ready to Cut and Paste our Code Patches
The second half of this book has a lot of code examples which you and copy and paste into your own project.
This process is a lot like cutting out pieces of a magasine and pasting them into a collage or cutting our fabric patches and sewing them onto a piece of clothing. There are step by step instructions and your the different parts of your code are a bit like a dress pattern that you cut out and sew together.
As you start this process you are bound to make plenty of mistakes and get pretty confused, but stick with it. As you progress you will start to notice patterns that you have followed before and it will start to seem more familiar.
Remember, you are new at this! If you were sewing your first jacket, then normally you would follow a pattern designed by someone else. In the same way, you also don’t have to start off making your own games from scratch, lets follow some patterns. We can still make it our own through what patterns we choose to put together, the characters and stories we imagine, and the graphics and sound we create.
Getting Started adding new Game Elements
As described in the chapter choose your adventure there are three main groupings for new game elements that you can add to your project. Game Mechanics, Game Space, Game Polish.
To get started we suggest the following starter projects.
- Game Mechanic: Add Moving Enemies\
- Game Mechanic: Jump on Enemies\
- Game Polish: Adding your own Sound Effects
- Game Polish: Adding Animations to your Character\
- Game Space: Add your own Background Image
- Game Space: Add a Game Over State
For a larger list of what’s available have a look a the chapter list of this book or use this page for a quick set of links to the code examples. http://ggc-examples.glitch.me/
If you like the process of stepping through code that someone else has created in a logical way then I would suggest following this more advanced tutorial from Belen Albeza from Mozilla using Kenny’s graphics. I’ve used the ideas and the game art a lot for this example. That tutorial is a great next step if you want to take the knowledge from this beginner book further. It is also structured in a way more like a web professional would do it.